Pages

Wednesday, November 21, 2012

The Ents and the lost Wife


So at last I have collected all the pictures from the Long Expected Party back in September. I figured I could share one last post about our Lord of The Ring themed Ent costumes.

 Let us start with the Ents.

Both of my brothers made Ent costumes. I designed them, found the fabrics and then turned the patterns, fabrics and sketches over to my brothers to create costumes of their own.


I was impressed with what they came out with, especially since they had neither of them sewn before. And they did these entirely on their own. (Well, they did have a bit of help...)


Love the tennis shoes right :D


This Ent was supposed to be a bit more of a bohemian piratical Ent. I like how how it turned out. (I did do all the dreads.)


Capes automatically make things more cool!


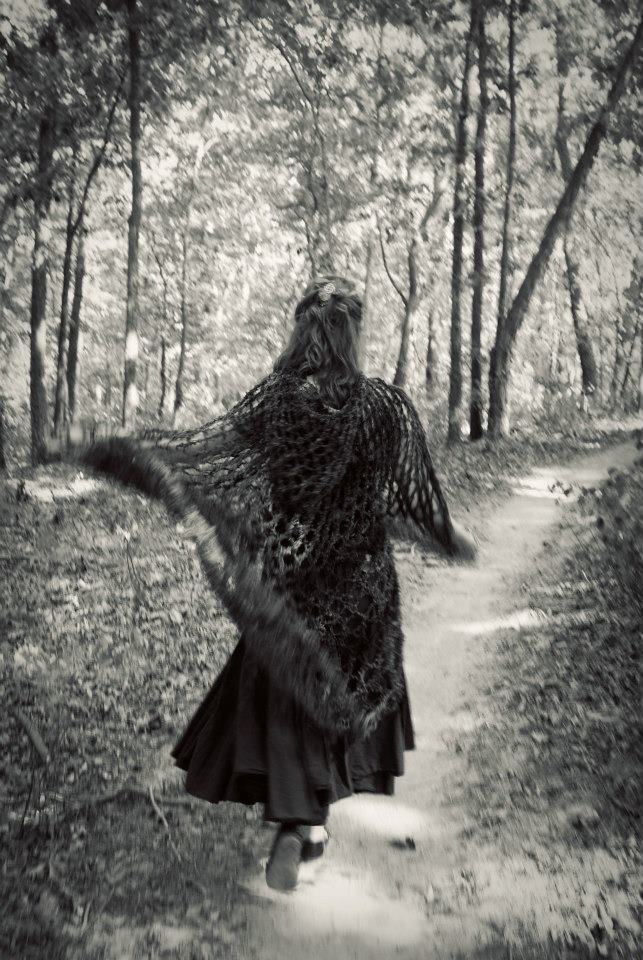
The lost wife has captured the Ents once again.


On to my costume...

My costume had 28 separate pieces all together that I put on to complete this outfit.


There were about 25 different fabrics used in my costume, between the corset, the skirt, the blouse, and the smaller pieces.


Then I hand knit the cape I wore. That took about a month, working off and on during rehearsals and shows. 


Then there was the hair. Yarn dreadlocks!!! There was about 10 or more different types of yarn wrapped into my hair.


It took 4 hours to wrap all my hair into the dreads. I parted my hair and had two friends working at the same time. It then took 2 hours to remove them 3 days later. I am working on a post dedicated just to the dreadlocks and how to put them in. They were really comfortable and I loved them!


I painted all my nails with black, brown metallic, and then a green glitter crackle top coat.


I made a wrist brace that laced up and attached to an arm brace above my elbow. I also made just an arm brace for the other arm.

Then there was the foot thong/sandle thing, laced to the ankle brace that wrapped around and laced to the garter. (Not really a garter, just don't know what else to call it.) I didn't get a picture of the garter. That part was covered by my skirt. And it kept sliding down while I was dancing, so I eventually tore it off and gave it to someone as a memento. (Not like you meet an Entwife on a regular basis.)

Here the Wife is with a lovely and adorable Hobbit!!!


I also wore 18 different jewelry pieces. All made by the amazing Shaylynn over at Shealynns Faerie Shoppe. Check her blog out for a more detailed description on the jewelry.


Here is the lovely Shaylynn of jewelry making fame in the dress that I made for her to wear.

Without her I would not have had the costume that I did! I would have probably tried making my own jewelry out of tree material, and that might not have worked so well....


It was great fun! And part of what I like about my costume is I am not stuck with an unusable costume in the end. I have lots of lovely jewelry that I can wear whenever. (Or when the outfit permits.) And multiple costume peices that can be turned into whatever other costumes I want them to be... within reason. But hey, I could be a hag, dryad (aka tree spirit... which is the same as an entwife, right? Same thing, just different names...), mermaid, witch... and who knows what else. But I like it best as the lost Wife.


Now time for a random little known fact. The reason the Entwifes ran away from the Ents and could no longer be found was because they decided it was way more fun to live with the pirates!!! True story.


And there you have it, the tale of an Entwife.

We are considering wearing these costumes for the premier of The Hobbit, but I am not sure I want to do that. It isn't exactly a warm costume.

I took none of the picture in this post. I borrowed them from friends. So for more pictures of the dance and others costumes check out these two, Caleb Royer Studios and Shaylynn. My mom and some other friends were also responsible for one or two of the photos as well.

Anyhow, hope you enjoyed it. As always, I appreciate comments and questions.

Toodles.

Tuesday, November 20, 2012

Tuesday Tutorial ~ hand painted totes

I am not sure this classifies as a tutorial. Rather step-by-step pics on some stuff I have done.

I decided to try my hand at painting as it was one of the few things I hadn't attempted yet. As I am very fabrics oriented I of course got fabric paints and some hand totes to paint on.


They are just basic canvas totes. (I cheated and got them from Walmart. But I was making them as gifts and needed them rather soonish.)


The first one I did was a horse head (for a horse lover friend.) I started with drawing the basic lines with a disappearing ink.


Then I added more detailed lines with the wash out pen.


Then I got out the paints. I used Tulip soft fabric paints.


I added the basic lined and shading with black.


Then I used brown for the mane and added dimension.


Went back with the black and continued to fill in.


Then I added some gold into the mane and as other highlighting. You can't really see it in the picture. But it is there.


Here it is without the blue and purple lines. I was happy with how it turned out.


Next I had a theatre friend whom I was making one for. So I did one with drama faces on it.

For this one I printed off the faces and used a scalpel to cut it out and then traced them onto the bag.


Both faces traced on.


Then I free handed her name in.


Painted it all with black.


Added gold shading.


A closer up on the shading.


That was my adventure into painting. Haven't done anything since, but I want to. One day I shall find time again.

I enjoyed it.

That's all for now.

Toodles

Sunday, November 18, 2012

Designer of the Week: Caroline Reboux

With winter fast approaching I decided to pull out my hat collection. 

I have many hats I have made myself (newsboys, berets, and knit tams.) But I only had two winter felts, and they were both fedoras. I am not a big fedora fan. At least, not for my own personal wear. I think they look great on others, (especially guys in the 30s) but they just are not my style. 

So I decided to change my felt fedoras into cloches because I like those so much better. (And I didn't have any winter cloches.)

Anyhow, it got me to thinking... Who invented the cloche anyhow, and why have I not covered a milliner in my designer of the week? 

So this week we have Caroline Reboux (1837–1927) as our feature.


Famous Parisian milliner and French designer she was often known as the "Queen of Milliners."

One of her greatest accomplishments that still lives with us today is the cloche invented in 1908. She has been credited with creating and popularizing it. She also was the first milliner who added veils and the use of coloured veils to hats.


She opened a shop in Paris in 1865 and was based there most of her life. She also opened other stores in Paris and London. Many whom she taught went on to open stores in New York and Chicago.


Caroline Reboux also made the trademark berets that Marlene Dietrich wore. (A style not normally worn by women till then.)

Caroline was a leading milliner and remained so till her death in 1927.


Now for some random cloches. I love the shape and style of the cloche. I need to get me some more!


They are so warm (coming down over the ears and all.) and since they are so snug you don't have to worry about them blowing off. 

That's all for now.
Toodles


Tuesday, October 9, 2012

~Tuesday Tutorial ~ Up-cycled t-shirts

So what do you do on a cold rainy day?
Pull out the bag of way too big old t-shirts and start up-cycling!

I used a Men's Medium t-shirt and made it into a short sleeve shrug/jacket thing.

Here is the basic layout on how I cut the t-shirt out.


The strips that I cut off of the bottom I sewed together and they became the ruffled edging all around. 


Then on the sleeves I did a double tulip sleeve. 


I should have taken more picture probably in the process, but I find I just get so busy and have so much fun with the projects that I forget to take pictures... 

But it was all very simple and basic. I started by cutting the t-shirt down. Then I sewed up the side seams. Then I sewed all the strips together and ran them through a rolled hem stitch which gave it the ruffled edge.

Then I sewed the edging onto the body of the garment all the way around.

Then for the sleeves I cut open the t-shirt sleeves and cut out double tulips. Ran them through the rolled hem ass well, then put them together and sewed them into the armholes. It all went together super quickly and easily!!!

My tulip sleeve tutorial can be found here.

I love it and will be doing this again.

As always, feel free to ask any questions!

Toodles 

Wednesday, September 19, 2012

The trees have Awakened!!!

Time for a sneak peak! (Because that is all the time I have had for pictures, nothing real yet.)
I have completed my costume and parts of my brothers ent costumes as well. That which I am not making for them they are making themselves. 
I made this hat (rather cut down a top hat and decorated) for my one brother. 

I also have made about 30 dreadlocks for my other brother.

My jewelry came in this week! It is beyond beautiful!!!!


I love it all so much!


I described the basic idea for what I wanted to a friend of mine over at Shealynns Faerie Shoppe and she did the rest.


We combined pine cone roses with copper wire, leaf beads and all sorts of other amazing stuff!


This ear cuff thing is one of my favorite pieces. (if it is possible to have a "favorite" with everything being to pretty!) It wraps around the back of my ear and makes it look like vines are growing out of my head. Perfect for an ent wife. And it also wraps around my glasses and makes it look like they are a part of my costume.

Yarn dreads for my hair...


The only parts I have left to finish before I am ready for the dance is hair and makeup. I am going to be putting in about 70 yarn wrapped dreadlocks on Friday.

I will have many more detailed pictures of the whole outfit all together after this weekend including a step by step as I put it on and put in the dreads.

Toodles.


Sunday, September 9, 2012

Entwife Update

So I mentioned back here about the knitted cape I made for my entwife costume that I was designing.

Well, it is finally taking shape, but still not finished. I have about two weeks to complete it.

I went out with the few pieces that I have completed and did a photo shoot with a friend.

So here are a few pictures.


Remember, is not completed.


The cape I knit by hand and it took me about a month working on it slowly.


The corset I designed the pattern for and constructed myself. I made a base and then covered the entire thing with tiny pieces of fabric and lace that I distressed and then hand sewed yarn vines onto.


I am still making the skirt that I will actually be wearing.


I am still finishing all the arm and leg braces and the skirt.


I am also going to do yarn dread in in my hair using a variety of green and brown yarns.
And I have a very talented good friend who is making me a complete jewelry set to get with the outfit. Check out her blog. Or like her on Facebook.

Anyhow, I will post more detailed picture of my completed costume once completed. There will also be picture of my brothers in the Ent inspired costumes as well.

Toodles